Paracord bracelets are versatile, durable, and stylish accessories made from high-quality paracord; They serve as practical survival tools and fashionable jewelry, offering endless customization options for users.

Overview of Paracord Bracelets and Their Popularity
Paracord bracelets have gained widespread popularity due to their versatility and durability. Made from high-quality paracord, these bracelets serve as both practical survival tools and stylish fashion accessories. Their popularity stems from their customizable designs, which allow users to choose colors, patterns, and additional hardware. They appeal to outdoor enthusiasts, survivalists, and crafters alike, making them a trendy yet functional item. The ease of creating paracord bracelets at home, coupled with their practical uses, has further boosted their appeal among DIY enthusiasts and gift-makers.
Why Paracord Bracelets Are a Great Survival Tool
Paracord bracelets are excellent survival tools due to their versatility and functionality. They contain multiple feet of durable paracord, which can be unraveled and used in emergencies for tasks like securing shelter, creating a makeshift rope, or even first aid. The compact design makes them easy to carry without adding bulk, ensuring they are always accessible when needed. Additionally, the paracord’s strength and resistance to wear and tear make it a reliable resource in survival situations.
Materials and Tools Needed
Paracord (type III 550), scissors, a lighter, and a buckle are essential. Optional tools include a measuring tape and a knife for precise cuts and shaping.
Types of Paracord and Their Uses
Paracord is available in various types, with Type III 550 being the most common for bracelets due to its strength and durability. It features a 550-pound tensile strength. Type II and Type I are lighter options, suitable for less demanding projects. Colored paracord is popular for aesthetic designs, while glow-in-the-dark varieties add functionality. Each type offers unique benefits, making them versatile for crafting survival tools, jewelry, and decorative items.
Essential Tools for Making Paracord Bracelets
To craft a paracord bracelet, you’ll need a few basic tools. A pair of sharp scissors or a utility knife is essential for cutting the paracord accurately. A lighter or torch helps in melting the ends to prevent fraying. A measuring tape ensures proper sizing, while a buckle or knot serves as the closure. Optional tools like a paracord needle or weaving aid can simplify the process; These tools are readily available and make bracelet creation efficient and professional-looking.
Basic Knots for Paracord Bracelets
Mastering essential knots like the Lark’s Head and Square Knot is crucial for creating durable and stylish paracord bracelets. These foundational knots ensure secure and professional finishes.
Lark’s Head Knot: A Beginner’s Guide
The Lark’s Head Knot is a simple yet essential knot for paracord projects. It involves forming a loop and threading the cord through it, creating a secure starting point. This knot is perfect for beginners, as it provides a clean foundation for weaving and ensures the bracelet stays intact. With clear instructions and practice, mastering the Lark’s Head Knot becomes second nature, making it a versatile and reliable technique for any paracord bracelet design.
Square Knot: The Foundation of Paracord Weaving
The Square Knot is a fundamental technique in paracord bracelet making, ensuring a secure and neat connection between strands. It involves crossing two cords, looping them around each other, and tightening to form a sturdy bond. This knot is crucial for maintaining the bracelet’s structure and is often used to finish or join sections. With practice, the Square Knot becomes second nature, allowing for seamless weaving and a professional finish in any paracord design.

Step-by-Step Guide to Making a Paracord Bracelet
Start by measuring and cutting the paracord to your desired length. Secure the ends with a temporary knot and begin weaving your chosen pattern.
Measuring and Cutting the Paracord
For an 8-inch bracelet, use approximately 8 feet of paracord. Measure the cord with a ruler or tape, ensuring accuracy. Cut cleanly with sharp scissors or a knife, avoiding frayed ends. To prevent fraying, gently melt the cut ends with a lighter. Secure the ends with temporary knots to keep the cord organized during the weaving process; This step ensures a smooth start for creating your bracelet.
Setting Up the Base and Weaving the Design
Begin by folding the paracord in half and securing it to a stable object. Form a loop at the folded end to create the base. Use a square knot or Lark’s Head to start weaving. Pass the working ends through the loops, following your chosen pattern. For a two-color design, alternate strands to achieve the desired visual effect. Keep the tension consistent to ensure a tight weave. Use a comb or fingers to tighten each stitch for a professional finish.
Finishing the Bracelet with a Secure Knot
To complete the bracelet, tie a secure knot at the end, such as a square knot or a bowline. Tighten the knot firmly and trim excess paracord with scissors. For added security, melt the cut ends with a lighter to prevent fraying. Ensure the knot is snug but not overly tight, allowing for a comfortable fit. Finally, test the bracelet by tugging gently to confirm the knot’s stability. This step ensures a durable and long-lasting accessory.

Customizing Your Paracord Bracelet
Personalize your bracelet with unique color combinations and patterns. Add beads, charms, or hardware for a distinctive look. Use various braiding techniques to enhance its visual appeal.
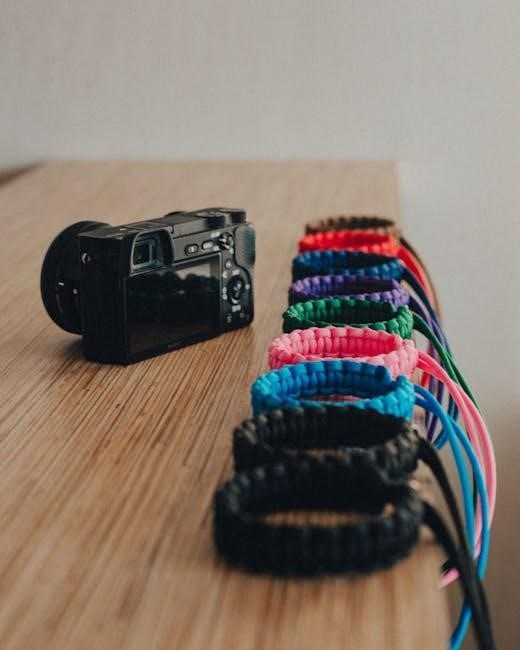
Using Multiple Colors for Unique Designs
Using multiple colors is a fantastic way to create unique and personalized paracord bracelet designs. By incorporating two or more colors, you can achieve vibrant patterns and styles. For example, using red and black creates a bold look, while blue and green evoke a natural feel. Layering colors or alternating them can add depth and complexity to the design. This technique allows for endless creativity, enabling you to craft a bracelet that reflects your personal style or matches specific occasions. Experiment with different combinations to find your perfect design.
Adding Hardware or Charms for Personalization
Adding hardware or charms is a great way to personalize your paracord bracelet. Metal clips, beads, or pendants can be incorporated to add functionality or style. For instance, a side-release buckle provides a secure and easy-to-use closure, while decorative charms can give your bracelet a unique touch. These elements not only enhance the visual appeal but also allow you to customize the bracelet according to your preferences or occasions. Experiment with different hardware and charms to create a one-of-a-kind accessory.

Troubleshooting Common Issues
Common issues include frayed ends, uneven weaving, and loose knots. Use a lighter to seal frayed paracord, adjust tension while weaving, and tighten knots securely.
Fixing Uneven Weaving or Loose Knots
Uneven weaving and loose knots are common issues that can be easily fixed. Gently pull the paracord strands to tighten and align the weave. For loose knots, retighten them by pulling both ends firmly. If frayed ends appear, use a lighter to carefully seal them. Regular inspection and adjustments ensure a sturdy and professional finish. This step ensures your bracelet remains durable and visually appealing, preventing further issues during use.
Adjusting the Bracelet Length for a Perfect Fit
To ensure a perfect fit, measure your wrist and cut the paracord accordingly. Thread one end through the buckle and pull gently to tighten. After weaving, adjust the length by loosening or tightening the knots. For a secure fit, leave a small gap between the knots and the buckle. Use a lighter to seal frayed ends for a polished finish. This ensures comfort and durability, making your bracelet both functional and stylish.
Mastering paracord bracelet making unlocks a world of creativity and practicality. With patience and practice, you’ll craft durable, stylish accessories perfect for survival or everyday wear. Keep experimenting and enjoy the satisfaction of creating something truly useful and personalized!
Final Tips for Mastering Paracord Bracelet Making
Always start with high-quality paracord for durability. Practice consistency in knot tying to ensure a tight, even weave. Experiment with colors and patterns to create unique designs. Keep your tools organized and within reach. Watch tutorials for advanced techniques and join crafting communities for inspiration. Be patient and creative—mastering paracord bracelet making is a skill that evolves with practice. Enjoy the journey from a simple survival tool to a personalized accessory!
Exploring Advanced Designs and Projects
Once you master the basics, explore advanced designs like intricate weaving patterns, 3D shapes, or multi-color combinations. Incorporate beads, charms, or metal hardware for added functionality and style. Try creating wider bracelets or integrating other materials like leather. Experiment with specialty knots and braids to develop unique textures. Expand your skills by crafting paracord accessories like keychains, bag straps, or pet collars. The versatility of paracord allows for endless creativity, turning simple projects into functional art. Check out tutorials for inspiration and advanced techniques to elevate your craft.